
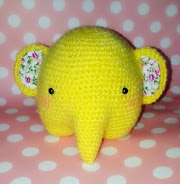
Amigurumi: Elephant

I crochet this little yellow elephant ami early last year. When I saw Stephanie of All about Ami post about this elephant ami in her instagram I thought to myself this is must try project. I'm really glad Stephanie decide to translate the pattern to english and do the tutorial as well. Without her tutorial, making this little guy maybe quite confusing by just read the pattern alone because there are different technique on crocheting the limbs. You can refer the pattern and tutorial of this elephant ami HERE.


This project start by crocheting in oval shape which is the body of the elephant.

Side of left and right at near the end of the oval shape was joined by single crochet chain to make the hole where the elephant's trunk will be crochet on later.

Crocheted tab under the hole was used to connect to other side of the oval shape to make another five holes. 4 holes at the left and right side of the elephant body is where the limbs of the elephant will be crochet directly to the body.
 |
| hind limb |
 |
| Front limb |
As in the Stephanie tutorial, I crocheted the limb from the left hind limb and then left front limb, then right front limb and right hind limb.


I crocheted the elephant's trunk at the first hole that I made. Different from Stephanie tutorial, I crocheted the trunk first before I attached the safety eyes because I need the trunk as the center so that I can placed the safety eyes in symmetry.

Fill the elephant body with the polyfiber through the hole at center of the body. Close the last hole by sew crocheted circle to the body.

I added the fabric lining to the ear with the only fabric I have during that time. Hence, the color of the fabric pattern totally not match with the yarn's color. So as final touch, I add pink blusher to elephant cheeks to match with the color of the flower pattern ^^


0 Comments